

Here's an easy way to make art with canvases... no artistic skill required! You can have the art say whatever you want, and you can size it to suit your needs. You will need:
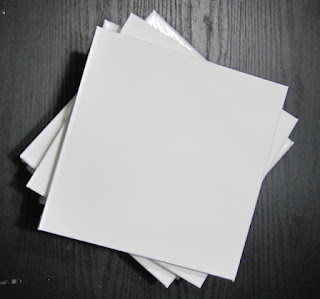
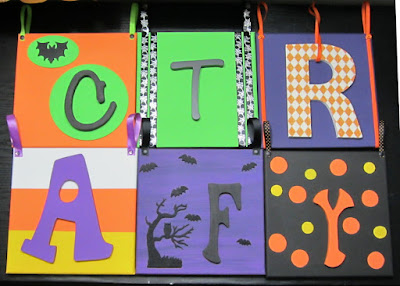
Canvases. Inexpensive canvases in various sizes are available at Michael's, other arts and crafts stores, and even Dollar Tree. I used six 10" x 10" canvases to cover a large wall area of six feet.
Letters. Now that decorating with letters is no longer a trend, people are donating letters to thrift stores, and craft stores are putting letters on clearance sales. Smaller posterboard letters are also available, or you can cut letters from scrapbook paper. I purchased wood and chipboard letters at thrift stores and at JoAnn for about $1 each.

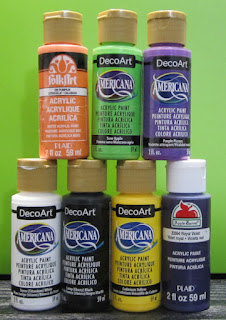
Acrylic craft paints. I used Halloween colors because I planned to hang the canvases in my Halloween theme workroom.
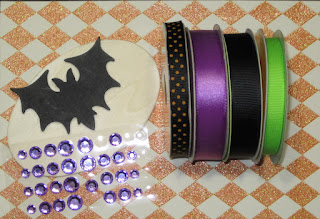
Decorative items to add to the canvases and/or letters. I used wood shapes, adhesive gems, scrapbook paper, and stickers.
Ribbon for hanging the canvases.
You'll also need thumbtacks and basic craft supplies such as scissors, paint brushes, and glue.
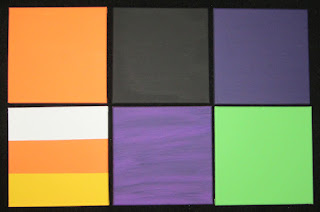
To begin, paint your canvases. Don't forget to paint the sides! I painted four canvases in solid colors, one in two shades of purple, and one in candy corn colors (using painter's tape to make straight lines).
Paint, decoupage, or otherwise decorate your letters. I painted most of my letters a solid color. I decoupaged scrapbook paper onto the "R."
When all the paint is dry, glue the letters to the canvases and add other decoration. (If you have a heavy letter, such as my chipboard "R," you may want to hang it in front of the canvas instead of trying to glue it directly to the canvas.) My decorations included painted wood shapes, ribbon, 3D stickers of bats and a spooky tree, and polka dots painted with round sponge spouncers.
Add ribbon for hanging the canvases. If you will be hanging them on a bar like I did, use a loop of ribbon from the back to the front on the canvas. To hang directly on the wall, attach the ribbon from side to side. Secure ribbon with thumbtacks pressed into the wood frame of the canvas.
Hang your completed canvases. I used a curtain rod hung on decorative hooks.

Feel crafty! :D
These look amazing! So good to see you back!
ReplyDeleteGreat to see you posting again! I've been coming to your site for years. I love how your instructions are always so clearly detailed and easy to follow - makes me feel even I can't screw it up. :)
ReplyDeleteFantastic idea! I have often eyed wooden and foam letters at dollar stores, but haven't picked many up over the years as I had no immediate need (or project ideas) for them. This changes that in the blink of an eye.
ReplyDeleteThank you for sharing another creative, terrific project with us.
Autumn Zenith 🎃 Witchcrafted Life
Good to see you back! Looks like a fun, easy project. Thanks!
ReplyDeleteMe encanta volver a leer sobre su nuevo proyecto :D
ReplyDeleteThanks for the post - I always enjoy your projects, and this one is no exception. Love it!
ReplyDeleteSo cute and fun!
ReplyDeleteIt was such a long time ago since I popped in here to have a look.
I love checking in and seeing new projects. Welcome back.
ReplyDeleteTransform your space with timeless charm by adorning vintage posters infused with nautical art. Each piece captures the essence of maritime adventures, combining classic aesthetics with coastal allure. The carefully curated collection showcases intricately designed Vintage Posters that transport you to a bygone era, celebrating the maritime spirit. Elevate your decor with these captivating artworks, blending the nostalgia of yesteryear and the allure of the open sea. Let the vintage posters weave a tale of seafaring elegance, lending your space a touch of timeless sophistication.
ReplyDeleteI like this blog. Thank you for sharing this information.
ReplyDeleteGreat reading your poost
ReplyDeleteGreat post thhanks
ReplyDeleteI hope you are well! I used to follow you obsessively
ReplyDelete