
I ordered style R-32 tiles online from DecorativeCeilingTiles.
 |
| style R-32 |
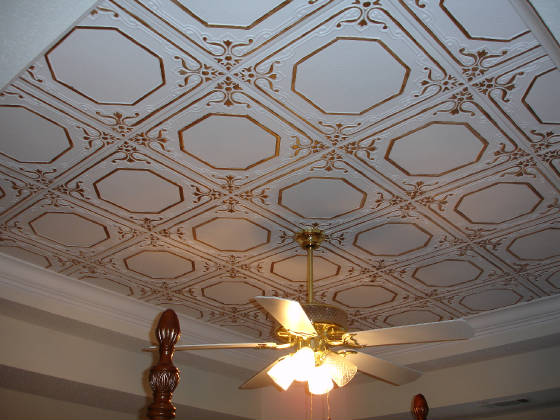 |
Before beginning installation, I measured my ceiling and determined how the tiles would need to be arranged. The tiles are 19.5" square; my ceiling measures 120" x 139". Thus my layout would be 6 tiles (plus 3" needed) by 7 tiles (plus 2.5" needed). I split the difference, leaving 1.5" on either side of the 6-tile run and 1.25" on either side of the 7-tile run. These small areas would be covered by crown molding. I wouldn't have to cut any tiles! How lucky is that?!
Next, I measured out 1.5" and 1.25" so I'd know where to start my rows of tiles, and marked the ceiling with chalk lines.

Then, I began gluing up the tiles. I put small dollops of adhesive in a few places around the tile...

I used Loctite Power Grab construction adhesive, and it worked GREAT. It grabbed quickly and I only had to press each tile in place for a few seconds.

Installation Tips:
- Press firmly on the tiles with the palm of your hand. Don't press too hard or press with just your finger because you might crush the raised pattern on the tile.
- Don't spread or flatten the adhesive on the tile if you're gluing to a popcorn ceiling. Dollops or globs of adhesive grab the texture better.
- Use white or clear adhesive if you're using unpainted tiles. The tiles are very thin, and colored adhesive will show through!
The installation was extremely easy and surprisingly fast. I had three rows of tiles up at 1:27 p.m.


At 1:50 p.m., I had four rows up.


Including prep and cleanup, the whole process took me less than four hours. I am very happy with the result! And it should look even better once the crown molding is installed. :)

Total cost of the project was less than $200:
- 42 tiles at 3.99 each + shipping = about $180
- 4 tubes adhesive at 3.50 each = $14

That looks amazing! Really classy! I don't know if I could do it myself- knowing my luck they would fall off on my head. :P
ReplyDeleteHa ha! My luck isn't always the best... I kind of half expected to wake up covered in tiles. Fortunately, they're light as a feather, so it wouldn't hurt if they fell on you. ;)
Deletevery nice - gonna try it in the future :)
ReplyDeleteThanks! :)
DeleteThey look absolutely amazing!
ReplyDeleteThank you!
DeleteBrilliantly done! A (relatively) cheap and quick project that makes a world of difference.
ReplyDeleteThanks! The tile pattern does make a big difference, and it also brightened up the room because the tiles are a brighter white than the dingy popcorn. :D
DeleteWAHOO! I'm happy that you went with that style -- it's so pretty! And WOW! Talk about a gorgeous and fast installation! GO BANE!
ReplyDeleteThank you! Yes, I'm glad I decided on that style. A more ornate style would have been too much for the small room. I wish more of my projects could be that fast and easy!
DeleteCool! Looks great!
ReplyDeleteUgh, I need to think about the floor and the yard and the kitchen and the garage....
ReplyDeleteBut now I wanna think about the ceiling.
So many projects! Sometimes I have a hard time focusing on just one (or five) at a time...
DeleteGood job! It looks fabulous :)
ReplyDeleteBeautiful!
ReplyDeleteIt looks amazing. I'm going to svae up and do my bedroom ceiling I think- because looks way easier than stripping the woodchip wallpaper off and re-papering!
ReplyDeleteIt's great to be able to just put the new right on top of the old. :) Much easier!
DeleteIt looks so nice!
ReplyDeleteI think you made the right choice keeping them solid white. Simple elegance!
ReplyDeleteMr. Kitty just recently installed crown molding in our downstairs. We used the polyurethane stuff and it was super easy to work with. He said it cut like butter, and the edges were amazingly clean. He did cheat and use the fancy corner pieces so he didn't have to worry about the complex upside-down-and-backwards angles (plus we have some outside corners that are bullnose [blech] so that would've led to a bunch of 22 1/2 degree cuts - not his idea of a good time). I love simple projects like that that have such huge impact!
You've inspired me to do another post on my home, even though it's a bit off-topic for my blog. I must take some photos this weekend!
Home post! Home post! :D It would be lovely to see more of the Kitty manse!
DeleteGreat to hear the poly crown molding is easy to work with. I also bought the cheater corners - partially because I didn't want to cope (pun intended) with challenging corner cuts but also because they look preeeety. :)
Haaaahaa, saw joke.
DeleteWhat a great idea! It looks really awesome.
ReplyDeletesomeday I will own my own house and I will return to your archives and glean ideas like a crazy person!
ReplyDeleteGreat! :) I love when my blog is useful to someone.
DeleteI love a good ceiling-- it has so much depth to the room. I am in love with the choice of tile you picked. So. Damn. Beautiful!
ReplyDeleteI love the fancy ceilings! Mine isn't quite the grand Victorian wallpaper-and-trimwork ceiling, but I'm very happy with it. :)
DeleteBane,
ReplyDeleteYour post is very useful to the user as you explain in great detail how did you do it. I have came to your site as I have seen some traffic on our site decorativeceilingtiles.net coming from your site and I am pleased that you are happy with the product and your new ceiling. Thank you for shopping on our site and for making this post.
Thanks for the comment. I received good service and fast shipping from your company, and I'm happy to post about the success.
DeleteThis turned out absolutely amazing! I remember when you posted about it before and were trying to decide what to do. I really turned out great.
ReplyDeleteThanks so much! Yeah, this project was set aside for several months. I was happy to finally be able to get it done. :)
DeleteI was just curious if this actually has lasted and you haven't had any falls.
ReplyDeleteYes, it has lasted. No tiles have fallen; there aren't even any loose corners. :)
DeleteThank for information
ReplyDeletePopcorn Ceiling Repair Contractors Ventura County
http://www.acousticremoved.com/
We are one of the renowned Popcorn Ceiling Repair Contractors in Ventura County and Santa Barbara, CA, offer professional services for Popcorn Ceiling and Texture Repair.